2019年3月20日 星期三
RJ45 loopback
markdown
網路線的水晶接頭,正式名稱為 RJ45,接頭總共有 8 個 pin 腳,一般在 Megabits 的速度中只會使用到 1, 2, 3, 6 四根接腳,其他四根 pin 腳其實是沒有用到的,如下圖所示

## Loopback
Loopback 其實就是把 RJ45 那四根 pin 的 TX+ 接到 RX+,TX- 接到 RX-,這樣 TX 傳甚麼資料出去,就會從 RX 收回來,那為什麼會有這個需求,可能有很多原因,例如要作 ethernet 燒機時,用一個 loopback 的 RJ45 水晶頭就可以自打自收作燒機
## Gigabit Loopback
Gigabit 模式下的 loopback 有人說在 windows 下無法啟用,因為 gigabit protocol 的 NEXT 功能會讓 loopback 失效,但 gigabit loopback 在網路上資料太少,所以到底能不能用目前還是不清楚
Reference:
* [《分享》RJ45網路線的針腳定義](http://www.shunze.info/forum/thread.php?threadid=1054&boardid=4&styleid=1)
* [請問Gigabit NIC如何做loopback的接頭](http://phorum.study-area.org/index.php?topic=39553.0)
* [Ethernet RJ45 connection wiring and cable pinout](http://pinouts.ru/NetworkCables/ethernet_10_100_1000_pinout.shtml)
* [RJ-45 Link基本原理](http://gienmin.blogspot.com/2014/02/rj-45-link.html)
* [Gigabit Ethernet is Full-Duplex only!](http://sqlblog.com/blogs/joe_chang/archive/2010/03/23/gigabit-and-full-duplex.aspx)
* [RJ45短路環在千兆網卡上的應用](https://blog.csdn.net/smstong/article/details/8812753)
* [Cable Testing 101: Understanding Near and Far End Crosstalk](https://www.flukenetworks.com/blog/cabling-chronicles/cable-testing-101-cross-talk-near-and-far)

2019年3月17日 星期日
SD Card Tester Privacy Policy
markdown
samliu720 built the SD Card Tester app as an Ad Supported app. This SERVICE is provided by samliu720 at no cost and is intended for use as is.
This page is used to inform visitors regarding my policies with the collection, use, and disclosure of Personal Information if anyone decided to use my Service.
If you choose to use my Service, then you agree to the collection and use of information in relation to this policy. The Personal Information that I collect is used for providing and improving the Service. I will not use or share your information with anyone except as described in this Privacy Policy.
The terms used in this Privacy Policy have the same meanings as in our Terms and Conditions, which is accessible at SD Card Tester unless otherwise defined in this Privacy Policy.
### Information Collection and Use
For a better experience, while using our Service, I may require you to provide us with certain personally identifiable information. The information that I request will be retained on your device and is not collected by me in any way.
The app does use third party services that may collect information used to identify you.
Link to privacy policy of third party service providers used by the app
* [Google Play Services](https://policies.google.com/privacy)
### Log Data
I want to inform you that whenever you use my Service, in a case of an error in the app I collect data and information (through third party products) on your phone called Log Data. This Log Data may include information such as your device Internet Protocol (“IP”) address, device name, operating system version, the configuration of the app when utilizing my Service, the time and date of your use of the Service, and other statistics.
### Cookies
Cookies are files with a small amount of data that are commonly used as anonymous unique identifiers. These are sent to your browser from the websites that you visit and are stored on your device's internal memory.
This Service does not use these “cookies” explicitly. However, the app may use third party code and libraries that use “cookies” to collect information and improve their services. You have the option to either accept or refuse these cookies and know when a cookie is being sent to your device. If you choose to refuse our cookies, you may not be able to use some portions of this Service.
### Service Providers
I may employ third-party companies and individuals due to the following reasons:
* To facilitate our Service;
* To provide the Service on our behalf;
* To perform Service-related services; or
* To assist us in analyzing how our Service is used.
I want to inform users of this Service that these third parties have access to your Personal Information. The reason is to perform the tasks assigned to them on our behalf. However, they are obligated not to disclose or use the information for any other purpose.
### Security
I value your trust in providing us your Personal Information, thus we are striving to use commercially acceptable means of protecting it. But remember that no method of transmission over the internet, or method of electronic storage is 100% secure and reliable, and I cannot guarantee its absolute security.
### Links to Other Sites
This Service may contain links to other sites. If you click on a third-party link, you will be directed to that site. Note that these external sites are not operated by me. Therefore, I strongly advise you to review the Privacy Policy of these websites. I have no control over and assume no responsibility for the content, privacy policies, or practices of any third-party sites or services.
### Children’s Privacy
These Services do not address anyone under the age of 13. I do not knowingly collect personally identifiable information from children under 13. In the case I discover that a child under 13 has provided me with personal information, I immediately delete this from our servers. If you are a parent or guardian and you are aware that your child has provided us with personal information, please contact me so that I will be able to do necessary actions.
### Changes to This Privacy Policy
I may update our Privacy Policy from time to time. Thus, you are advised to review this page periodically for any changes. I will notify you of any changes by posting the new Privacy Policy on this page. These changes are effective immediately after they are posted on this page.
### Contact Us
If you have any questions or suggestions about my Privacy Policy, do not hesitate to contact me.
2019年3月12日 星期二
Android studio build 出現 Lint found fatal errors
markdown
Android studio 在 build release apk 時出現 error,訊息為
Lint found fatal errors while assembling a release target.在 android studio 中其實找不太到甚麼有用的錯誤訊息,在 [SO](https://stackoverflow.com/questions/24098494/error-when-generate-signed-apk) 上面有人提供了解答,在在 report 路徑下會有 build fail 的詳細訊息,若是不知道 build fail 的原因的話,記得檢查一下 build fail 的 report,路徑如下
[app module]/build/reports/lint-results-yourBuildName-fatal.html
2019年3月7日 星期四
使用 R 語言繪製 CPK 圖表
markdown
R 語言可以用來繪製 CPK 圖表,雖然有時候會感覺畫出來的圖不是那麼的準確,但大部分狀況下應該是堪用了,特別是有時候只想簡略的表示一下資料分布情形
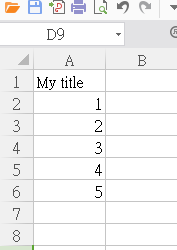
用 R 語言繪製圖表前需要先將資料準備好,只要將資料以 csv 的形式存起來,並且在第一列放上 title 就可以了,如下圖
然後在 R Studio 裡面使用 read.csv 將 csv 資料讀進來,並且 assign 給你的變數
接著需要使用 SigSigma library,若是沒有安裝的話,記得先用 install.packages("SixSigma") 來安裝
這個 library 裡面已經有 function ss.study.cs 可以將資料畫出 CPK 圖出來,這個 function 有一些參數需要設定
* xST,短期資料,就是從 csv 讀進來的變數
* LSL,規格下限
* USL,規格上限
* Target,規格中心
* f.main,圖表標題
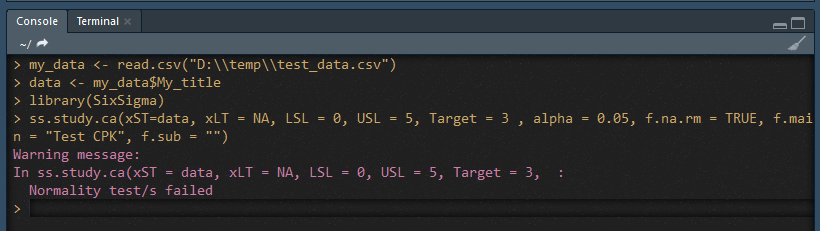
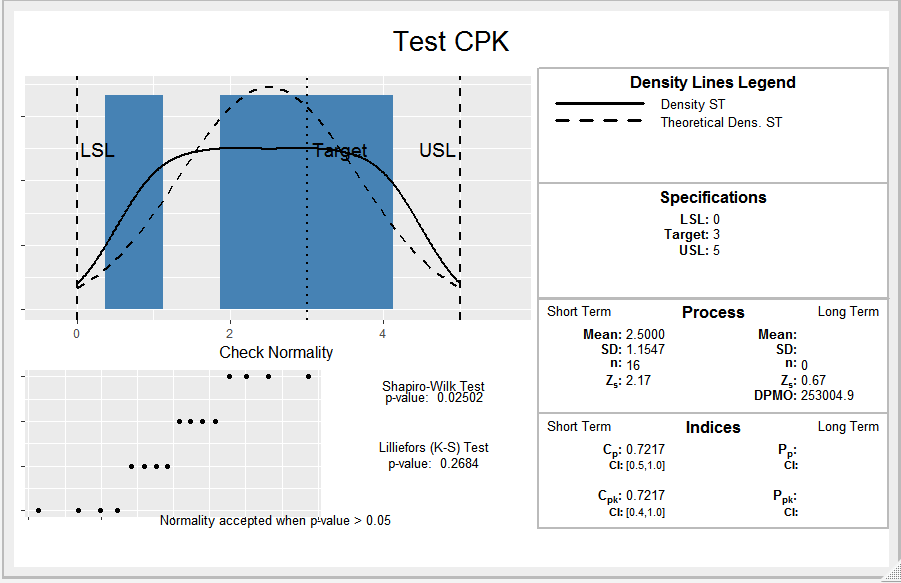
將這些變數設定好,執行這個 function,就可以畫出圖表來
---
* [R語言中的品質工具 -- 製程能力分析](http://alipupu.blogspot.com/2016/05/r.html)
2019年1月1日 星期二
Android ImageView 搭配 wrap_content 時的寬高
markdown
當 ImageView 的寬高設定都是 wrap_content 時,很自然會想到圖片是以原始大小來顯示在螢幕上的,不過最近才發現這個原始大小的單位不是 pixel,而是 dp
例如以下 ImageView 的寫法
<ImageView
    android:layout_width="wrap_content"
    android:layout_height="wrap_content"
    android:src="@drawable/my_png">
</ImageView>
假設圖片的原始大小為 256 * 256 pixels,不要以為在螢幕上就是佔了 256 * 256 pixels 的大小,實際上是佔了 256 * 256 dp 的大小,dp 會隨著不同的 device 而改變。假設圖片放在 res/drawable 資料夾,如果 app 現在跑在 XXHDPI 的手機上,圖片載入後長寬會變為 3 倍,佔用的記憶體會變為 9 倍。
這除了會讓圖片在螢幕上的大小比你預想的大之外,也會讓圖片占用的記憶體大小大大超出你的預期,不可不注意。
---
Reference:
* [Android中的dp,px以及wrap_content的实际展示效果](http://www.cnblogs.com/littlepanpc/p/3513929.html)
* [關於Android中圖片大小、記憶體佔用與drawable資料夾關係的研究與分析](https://itw01.com/V3NTEFQ.html)
* [Android坑档案:你的Bitmap究竟占多大内存?](https://zhuanlan.zhihu.com/p/20732309)
2018年12月21日 星期五
python 開源項目列表
markdown
[awesome-python-applications](https://github.com/mahmoud/awesome-python-applications#tag-internet)
網路上大神整理的各種 python 開源項目列表,先筆記一下備查
2018年11月17日 星期六
Markdown on Google blogger
markdown
用 Google blogger 用很久了,雖然一直覺得 Google blogger 很難用,但是又實在懶得換到其他家或是自己架 blog,最近無意間看到[網路](http://etrex.blogspot.com/2017/03/blogger-code-markdown-prettyprint.html)上有人分享在 blogger 上用 markdown 的方法,便想來試試看,因為一直有聽聞用 markdown 來寫 blog 是很方便的,希望用 markdown 能改善 google blogger 糟糕的使用體驗
要在 blogger 用 markdown 其實很簡單,主要概念是用 javascript 將使用 markdown 的文章內容抓出來,然後用網路上已經有人寫好的 javascript 函式庫 [showdown](https://github.com/showdownjs/showdown) 將 markdown 文章轉為 html 然後再更新回去,像我使用的 javascript 如下
<script src="https://cdnjs.cloudflare.com/ajax/libs/showdown/1.6.4/showdown.min.js">
</script>
<script>

// The > will replaced to > when using innerHTML, so replace it back to >
// for showdown to render blockquote
function blockquote(str) {
    return str.replace(/\n>/g,'\n>') ;
}

var converter = new showdown.Converter();
var posts = document.querySelectorAll(".post-body");
var s = "";
Array.prototype.forEach.call(posts, function(el, i) {
    var idx = el.innerHTML.indexOf("markdown");
    if(idx != -1 && idx <= 1) {
        el.innerHTML = converter.makeHtml(blockquote(el.innerHTML).replace("markdown",""));
        var pres = el.querySelectorAll("pre");
        for (var i = 0; i < pres.length; i++) {
            pres[i].classList.add("prettyprint");
            pres[i].classList.add("linenums:1");
        }
    }
});
</script>

<script src="https://cdn.rawgit.com/google/code-prettify/master/loader/run_prettify.js">
</script>
程式相當簡單,不言自明,接著在寫 blog 時只需要注意兩件事
* 在要用 markdown 編寫的文章最開頭放一行 markdown 字串讓 script 知道這一篇文章是用 markdown 寫的,需要做轉換
* 編寫文章時要用 HTML 的模式編寫
上面的程式碼區塊除了 markdown 的轉換之外,也引用了 Google 的 prettify 函式庫來做程式碼的上色
關於程式碼上色的寫法其實跟用 markdwon 之前完全一樣,markdown 有一個好處是他跟 html 相容,你可以直接在 markdown 文件中寫 html 內容,markdown 轉換時不會去動到 html 內容的東西
比較可惜的是若程式碼內有用到角括號,還是要先將角括號轉換成 < 和 > 才能將角括號與角括號內的文字正確顯示出來
若是沒有用 < > 這類跳脫字元直接用 < > 的話,在使用 innerHTML 會被當成是 html tag 並且將角括號內的文字轉成小寫,因為 html 先天就是 case insensitive,各家瀏覽器實作時都將 innerHTML 中的 tag name 轉為小寫
這篇文章就是用 markdown 寫的,使用的感想是寫文時真的舒服多了,markdown 的一個最大優點是它很純粹,很乾淨,沒有要做的包山包海複雜化而是用一些簡單的符號做出連結、標題、段落等效果,寫 blog 其實就只需要這些功能而已,如果真的 markdown 有做不到的部分,大不了直接寫 html 在裡面就好了
訂閱:
文章 (Atom)